 Tweet
Tweet
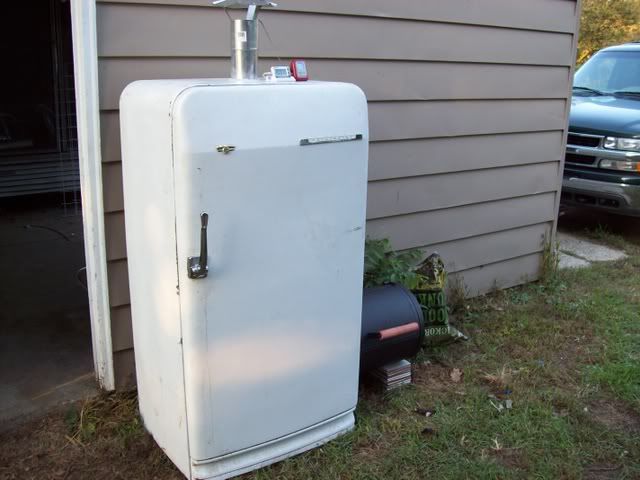
I had this posted on another site but believe it was lost in some sort of shuffle. I hadn't posted it here and after seeing posts regarding home made fridge smokers I thought I'd post this.
I�ve always liked the efficiency of a vertical smoker and everybody knows that an old refrigerator makes a great smoker. The benefits I see using this type of conversion are low cost to the building (Hah!), less operating costs due to the fridges insulation, the ability to cold smoke as well as hot smoke and the over all fact that you get to build it yourself.
Built properly, a fridge conversion will use less charcoal, produce an even heat and in turn put out some fine BBQ as well as cold smoke bacon, cheese and fish and anything else your heart desires. You name it, it�ll smoke it. For those who are on a budget and looking for that perfect wood or charcoal smoker, something like this will work out great because most of the material you�ll find laying around your favorite scrap yard.
From top to bottom, this unit can be built from scrap (although this one wasn�t) If you choose to, just peruse your local scrap yard rather than use the items like mine that were store purchased. I�m more of the lazy porch swing sitting, BBQ eating type that would rather go to the local hardware than search the scrap yards so this is what I came up with. In fact, I wonder how I worked up the energy to build this thing being so lazy. Well, enough about me.
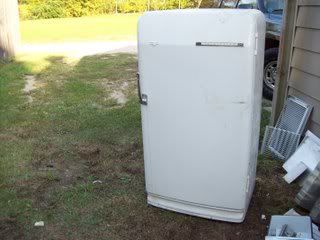
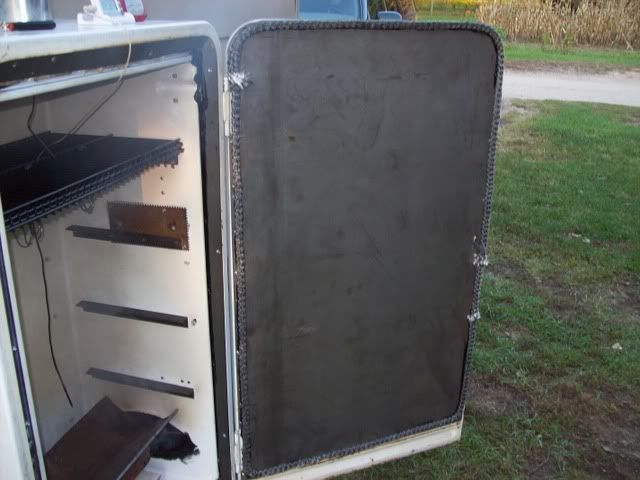
The first thing you�ll need for this project is an old fridge. The best donors are usually the pull handle porcelain enamel coated models although older magnetic strip seal models will work for you also just so long as there is no foam inside. There�s just a little more work involved.
For the purposes of this tutorial I�ll be using the older style, (a Frigidaire) as this is what I had searched out to use for my conversion.
Gutting out the fridge
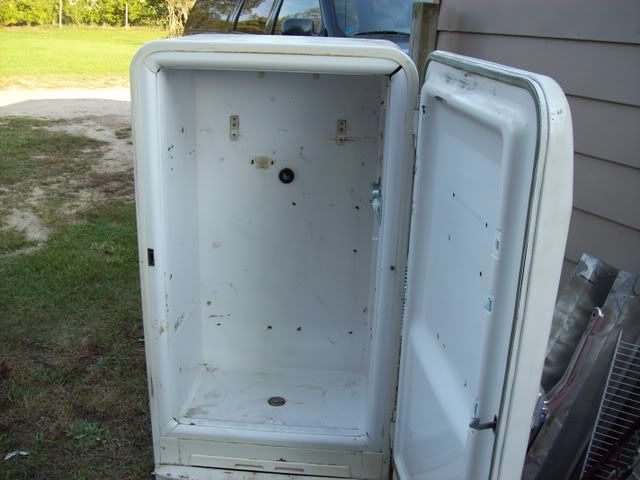
Next, you�ll want to remove the freezer compartment, refrigerant lines and any plastic such as shelf brackets, dial or grommets for wiring from the inside of the refrigerator compartment. Be sure to replace all the screws you remove from the brackets and fridge interior as best you can as this will seal the holes that would have been left otherwise.
The model I am using had a plastic panel on the interior of the door.
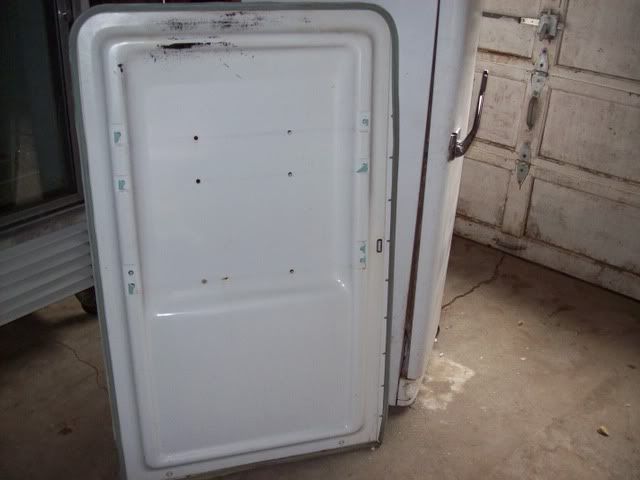
I�ll remove it and save it as a template and replace the material with 18ga. Sheet metal. Also made of plastic was some inside trim. As this is an integral part of the structure I�ll be replacing the trim as well using the old material as a template in the same fashion. The door seal material will also be replaced. (more on this later)
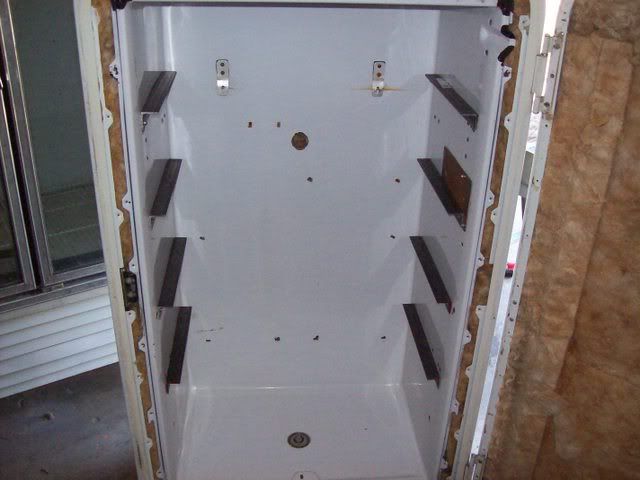
Now that freezer compartment and all of the shelves have been removed, as well as the thermostat, related dials and stubs of plastic that served as shelf brackets, this is what we have; a pretty empty fridge that will soon be a kick ass smoker.
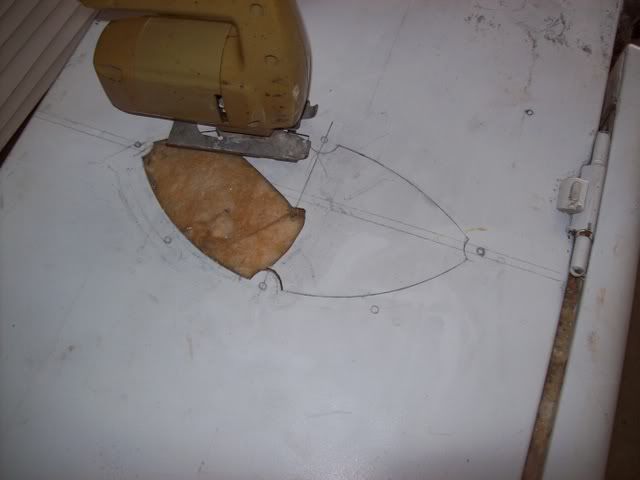
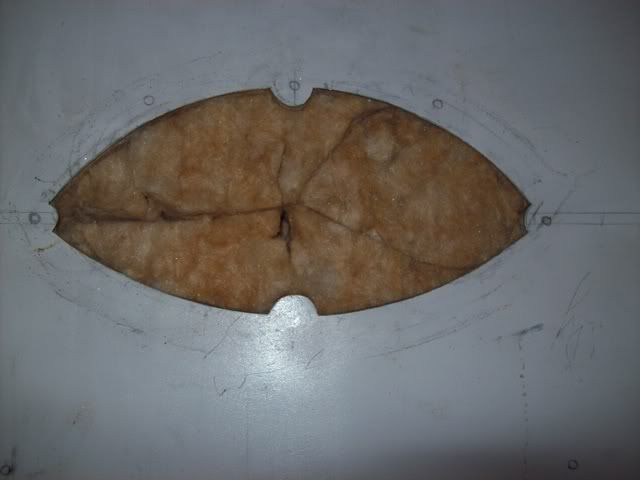
Before going too much further, I would suggest (if your door panel was plastic like this one) securing the insulation while waiting for the sheet metal to be cut and installed. A simple piece of wire tied across the door in a diagonal fashion will suffice here. You may install your sheet metal right away if you like, however, in my case I ordered the cut sheet metal and continued on with my fabrication. If you move the unit around too much prior to the door skin�s installation this will help to hold the insulation in place retaining its integrity until it�s covered properly.
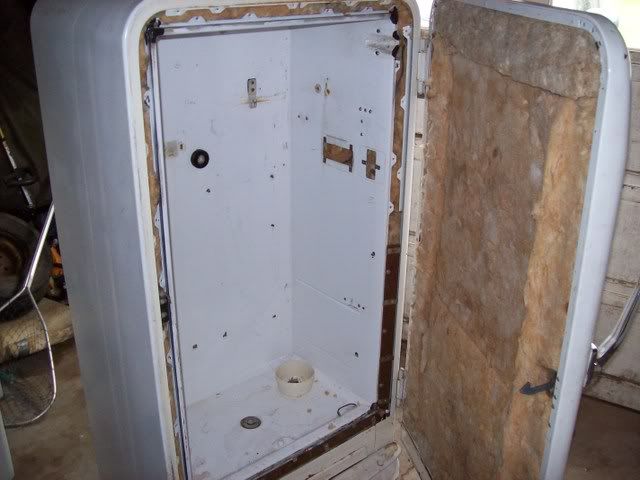
Receiving my sheet metal I got started on putting in the surrounding trim and installing the inner door skin. To achieve an easy installation I laid out the sheet metal using the old door�s interior marking out the hole for the door latch and then installing the door skin by using the reference marks previously made prior to removing the old plastic interior. I used �� tech screws to mount to interior sheet metal panel. You may find it easiest to go one corner at a time first the top, then bottom corners being sure that the door continues to shut evenly as you go. Misalignment will make the door difficult to close. Here is the completed interior panel and trim.
Shelving
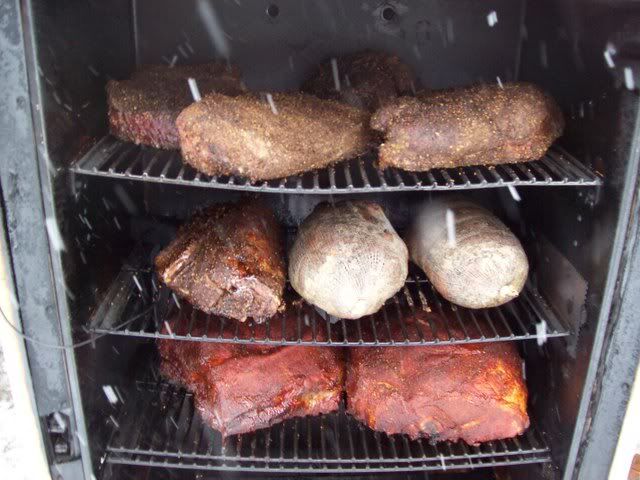
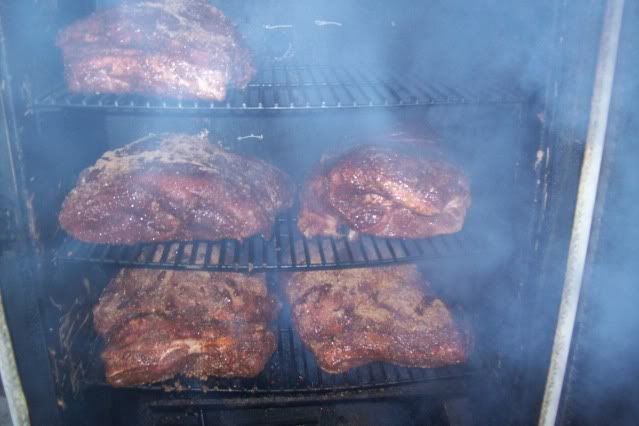
Next, we�ll need to consider some shelving for this unit. To make things simple as possible I opted to add four racks supported by some angle iron brackets. You can also use stainless steel if you prefer but the cost will be greater. There is enough steel built into the fridge already so I didn�t see the need to go with stainless.
First I measured and cut the brackets. In deciding how many brackets I would place in the smoker. I laid out a semblance of what would be my shelving inside of the fridge with a sharpy marker. (don�t worry, in case you make an error in marking, the marker wipes right off of the ceramic enamel) This gave me an idea of how everything would fall into place and what I would anticipate as far as cutting new holes, patching old ones and where screws might become a problem.
Here are the brackets after they�re installation. I secured the top shelf with a few extra screws as I will be also using a hanger for bacon & such on this shelf and figure for more weight. Overall four screws seemed to hold nicely on each of the lower angle brackets.
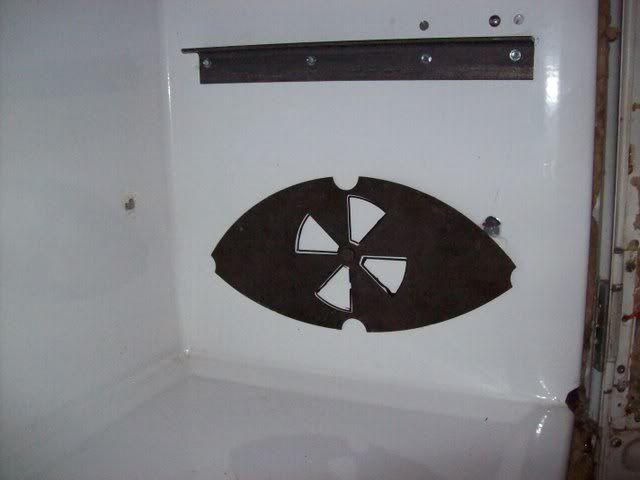
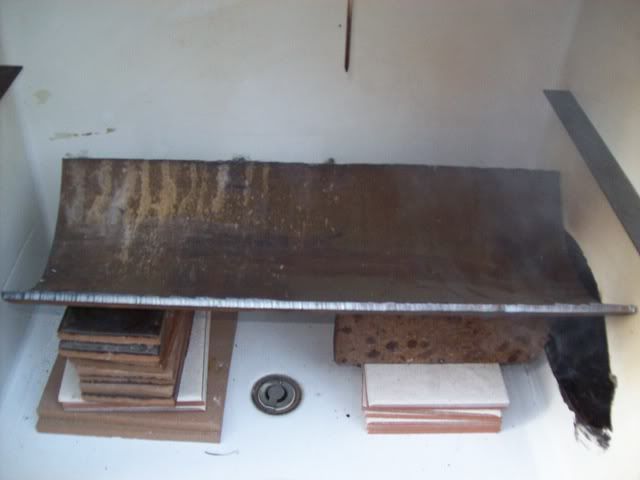
Notice the patch where the old thermostat dial used to be, also the hole in the back of the unit where the light was. I used a 500 degree RTV silicone sealant to seal out all of the holes that remained in the unit�s interior with exception of the thermostat dial. There a simple sheet metal patch did nicely. Also notice that enough room was left at the bottom to accommodate what will be a baffle to distribute the heat more efficiently. (more on that as we progress)

The Firebox
Through information I have from various sources, the size of a firebox should be approximately 30% of the size of the smoker. Due to the fact that I�m a lazy BBQ eatin porch swing sitting individual, I�ve opted to use Charbroil�s �Texas Style Fire Box� for my conversion. First, this assembly sells at most of your home centers for around $50. Secondly, I think that with the price of metal these days, along with the cost of labor. (seein as I�m too lazy to build it myself) will end up costing a great deal more than the store bought firebox) You can build one yourself but since I didn�t, I have no plans for one.
Another consideration is to just use a hot plate. Due to the fact that this is a Charcoal smoker not an electric or propane woodchip burning oven, so, we just won�t go there.
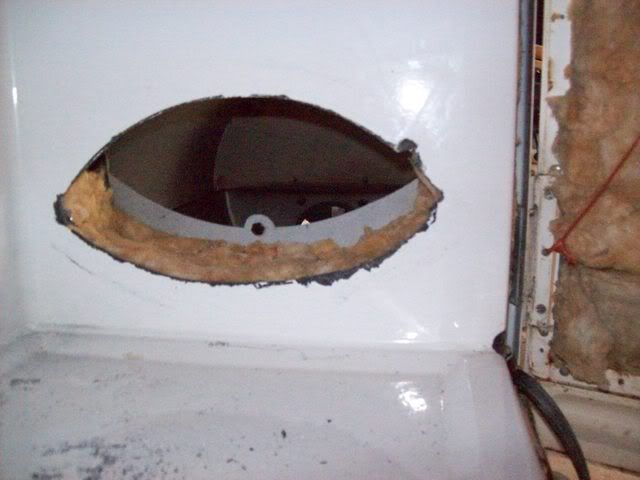
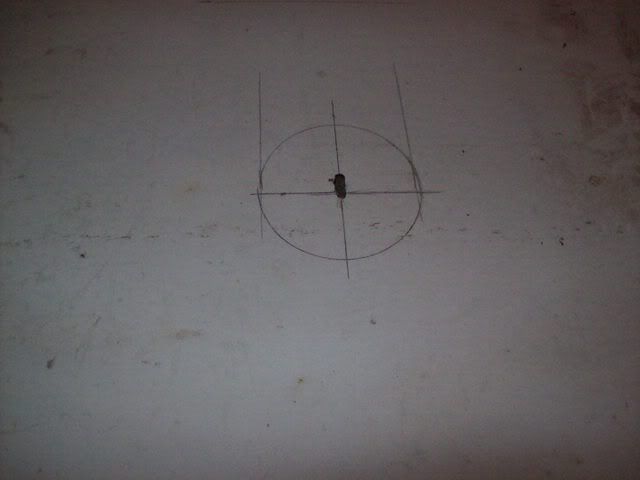
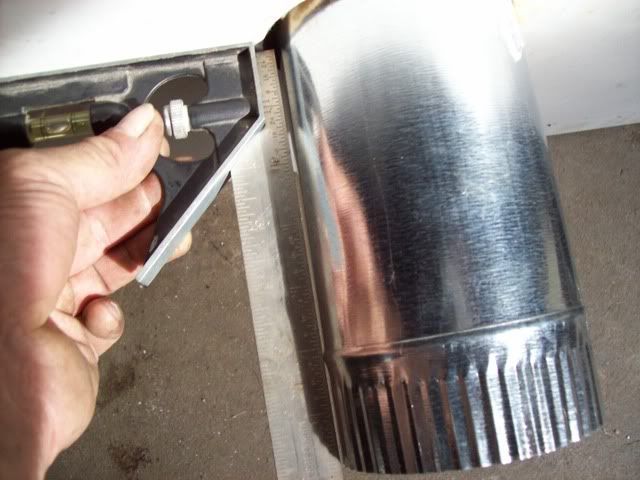
To install this firebox, I made several reference marks from the inside (smoke chamber) dimension to the outside of the fridge (outer shell) so that I would be able to get my firebox relatively centered in the smoke chamber as well as how high I wanted it to sit off of the floor of the chamber. Next, I laid the fridge on its side and set the firebox so that the bolt holes were within my reference points to be sure everything would fit nicely. When laying out you cuts, be sure to center the cutout on the inner shell rather than the outer shell.
After scribing all of my cut lines, I stood the fridge back up and double checked all the markings from outside to inside to be sure everything would line up ok.
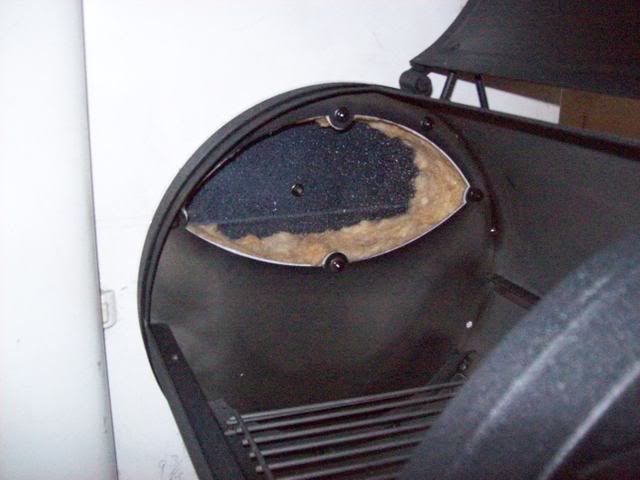
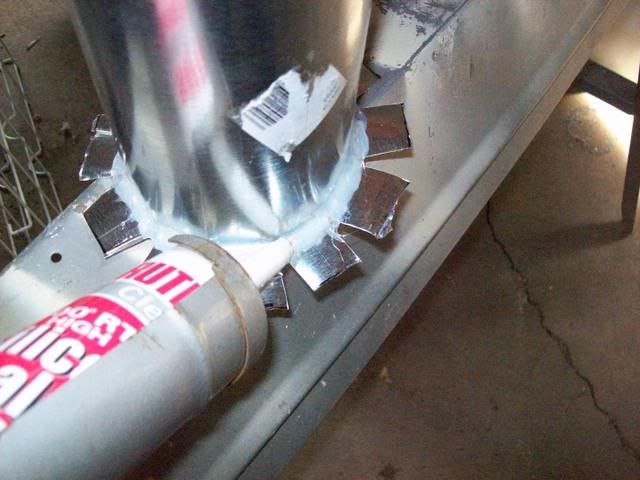
NOTE: before making my cuts. I drilled a hole dead center of my cut out to give me the ability to transfer the cut pattern to the inside of the smoke chamber. I also used this as a starting point for my inside cut. It would be a good idea to create a template from an old piece of �� plywood or paneling of the cut out on the firebox to transfer the pattern to the inner shell. This will make matching the inside and outside cutouts much easier. I had an old damper plug left over from a �chargriller�. This is what I used for this build instead.
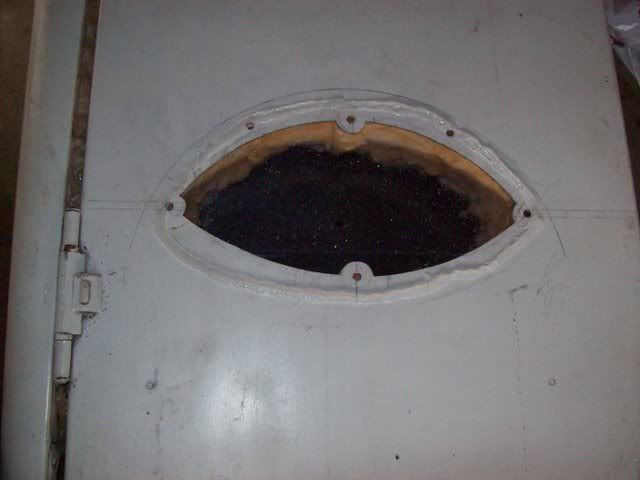
Being assured all was good, I started making my cuts.
Once completing the cuts necessary to make the outer shell cut out, I removed any excess insulation.
I�ve always liked the efficiency of a vertical smoker and everybody knows that an old refrigerator makes a great smoker. The benefits I see using this type of conversion are low cost to the building (Hah!), less operating costs due to the fridges insulation, the ability to cold smoke as well as hot smoke and the over all fact that you get to build it yourself.
Built properly, a fridge conversion will use less charcoal, produce an even heat and in turn put out some fine BBQ as well as cold smoke bacon, cheese and fish and anything else your heart desires. You name it, it�ll smoke it. For those who are on a budget and looking for that perfect wood or charcoal smoker, something like this will work out great because most of the material you�ll find laying around your favorite scrap yard.
From top to bottom, this unit can be built from scrap (although this one wasn�t) If you choose to, just peruse your local scrap yard rather than use the items like mine that were store purchased. I�m more of the lazy porch swing sitting, BBQ eating type that would rather go to the local hardware than search the scrap yards so this is what I came up with. In fact, I wonder how I worked up the energy to build this thing being so lazy. Well, enough about me.
The first thing you�ll need for this project is an old fridge. The best donors are usually the pull handle porcelain enamel coated models although older magnetic strip seal models will work for you also just so long as there is no foam inside. There�s just a little more work involved.
For the purposes of this tutorial I�ll be using the older style, (a Frigidaire) as this is what I had searched out to use for my conversion.
Gutting out the fridge
Next, you�ll want to remove the freezer compartment, refrigerant lines and any plastic such as shelf brackets, dial or grommets for wiring from the inside of the refrigerator compartment. Be sure to replace all the screws you remove from the brackets and fridge interior as best you can as this will seal the holes that would have been left otherwise.
The model I am using had a plastic panel on the interior of the door.
I�ll remove it and save it as a template and replace the material with 18ga. Sheet metal. Also made of plastic was some inside trim. As this is an integral part of the structure I�ll be replacing the trim as well using the old material as a template in the same fashion. The door seal material will also be replaced. (more on this later)
Now that freezer compartment and all of the shelves have been removed, as well as the thermostat, related dials and stubs of plastic that served as shelf brackets, this is what we have; a pretty empty fridge that will soon be a kick ass smoker.
Before going too much further, I would suggest (if your door panel was plastic like this one) securing the insulation while waiting for the sheet metal to be cut and installed. A simple piece of wire tied across the door in a diagonal fashion will suffice here. You may install your sheet metal right away if you like, however, in my case I ordered the cut sheet metal and continued on with my fabrication. If you move the unit around too much prior to the door skin�s installation this will help to hold the insulation in place retaining its integrity until it�s covered properly.
Receiving my sheet metal I got started on putting in the surrounding trim and installing the inner door skin. To achieve an easy installation I laid out the sheet metal using the old door�s interior marking out the hole for the door latch and then installing the door skin by using the reference marks previously made prior to removing the old plastic interior. I used �� tech screws to mount to interior sheet metal panel. You may find it easiest to go one corner at a time first the top, then bottom corners being sure that the door continues to shut evenly as you go. Misalignment will make the door difficult to close. Here is the completed interior panel and trim.
Shelving
Next, we�ll need to consider some shelving for this unit. To make things simple as possible I opted to add four racks supported by some angle iron brackets. You can also use stainless steel if you prefer but the cost will be greater. There is enough steel built into the fridge already so I didn�t see the need to go with stainless.
First I measured and cut the brackets. In deciding how many brackets I would place in the smoker. I laid out a semblance of what would be my shelving inside of the fridge with a sharpy marker. (don�t worry, in case you make an error in marking, the marker wipes right off of the ceramic enamel) This gave me an idea of how everything would fall into place and what I would anticipate as far as cutting new holes, patching old ones and where screws might become a problem.
Here are the brackets after they�re installation. I secured the top shelf with a few extra screws as I will be also using a hanger for bacon & such on this shelf and figure for more weight. Overall four screws seemed to hold nicely on each of the lower angle brackets.
Notice the patch where the old thermostat dial used to be, also the hole in the back of the unit where the light was. I used a 500 degree RTV silicone sealant to seal out all of the holes that remained in the unit�s interior with exception of the thermostat dial. There a simple sheet metal patch did nicely. Also notice that enough room was left at the bottom to accommodate what will be a baffle to distribute the heat more efficiently. (more on that as we progress)
The Firebox
Through information I have from various sources, the size of a firebox should be approximately 30% of the size of the smoker. Due to the fact that I�m a lazy BBQ eatin porch swing sitting individual, I�ve opted to use Charbroil�s �Texas Style Fire Box� for my conversion. First, this assembly sells at most of your home centers for around $50. Secondly, I think that with the price of metal these days, along with the cost of labor. (seein as I�m too lazy to build it myself) will end up costing a great deal more than the store bought firebox) You can build one yourself but since I didn�t, I have no plans for one.
Another consideration is to just use a hot plate. Due to the fact that this is a Charcoal smoker not an electric or propane woodchip burning oven, so, we just won�t go there.
To install this firebox, I made several reference marks from the inside (smoke chamber) dimension to the outside of the fridge (outer shell) so that I would be able to get my firebox relatively centered in the smoke chamber as well as how high I wanted it to sit off of the floor of the chamber. Next, I laid the fridge on its side and set the firebox so that the bolt holes were within my reference points to be sure everything would fit nicely. When laying out you cuts, be sure to center the cutout on the inner shell rather than the outer shell.
After scribing all of my cut lines, I stood the fridge back up and double checked all the markings from outside to inside to be sure everything would line up ok.
NOTE: before making my cuts. I drilled a hole dead center of my cut out to give me the ability to transfer the cut pattern to the inside of the smoke chamber. I also used this as a starting point for my inside cut. It would be a good idea to create a template from an old piece of �� plywood or paneling of the cut out on the firebox to transfer the pattern to the inner shell. This will make matching the inside and outside cutouts much easier. I had an old damper plug left over from a �chargriller�. This is what I used for this build instead.
Being assured all was good, I started making my cuts.
Once completing the cuts necessary to make the outer shell cut out, I removed any excess insulation.


 without a doubt.
  Points!


Comment